This will be the last of the RaceTab tutorial articles prior to the New Mexico Multi-Sport clinic next week. I encourage all coaches interested in learning more about using RaceTab to manage their cross country meet to attend the clinic session I'll be doing on July 31. It's best, but not necessary, if you're able to come to the clinic with a laptop and the RaceTab program loaded. Please note that this article does make an assumption that you are fairly at ease when working with computers. If that doesn't describe you, you'll probably want to actually see this done first-hand at the clinic rather than trying to understand everything by simply navigating this tutorial.
In this session, we'll learn how to upload teams and athletes into RaceTab without using online registration. The process is very simple with online registration, but we realize some people will want to use the program without online registration and this is designed to show you how to get your teams and athletes entered in the program manually. The process is still pretty simple.
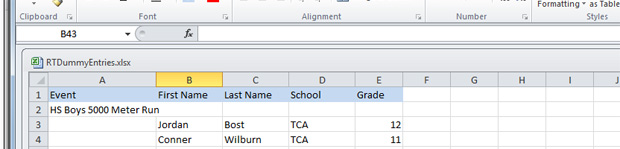
The first thing you'll want to do is to collect rosters of all athletes potentially participating in your meet from each of the various schools attending. Additionally, you want that information in the same format from each coach since you will be merging these files into one single file to import into RaceTab. Experience tells me the best way to do this is to send a simple Excel spreadsheet to each coach with the columns already labeled (as shown below).
Using the Excel spreadsheet occasionally becomes an issue if a coach on your invite list is using Open Office as this program can read Excel files, but Excel does not read Open Office files. Request (adamantly, if necessary) that any such coaches find a copy of Excel to use to make their entries (it's not that difficult to find a copy of Excel to use).
Once all entry files have been returned to you, you will copy-and-paste all entries into a single file without the Event, First Name, Last Name, etc. column headers in the top row. Simply copy the entries, without the headers, from the files coaches have sent you into another file. If your meet has separate varsity and JV races, it is enough to simply import all entries as either HS Boys 5000 Meter Run or HS Girls 5000 Meter Run. RaceTab does not require that athletes be entered in exactly the race they will run, only that they be entered into this program (This little fact will save you lots of time on race day when five coaches come to you telling you that so-and-so wasn't able to make it to the meet and we need to replace him/her in the varsity race with thus-and-such.).
Once you have completed copying the entries into your Excel file, save the Excel file as a .csv (comma delimited) file. This save option is under File/Save As/Save as Type. When dooing this in Excel 2010, you will get two prompts. Click OK on the first prompt and No on the second prompt. The next dialog box that appears allows you to save your entries as a regular Excel file (which is a good idea, go ahead and do it). When you save your .csv file, be sure to note the directory and filename you saved it under. You will need these to access the file when we load entries into RaceTab.
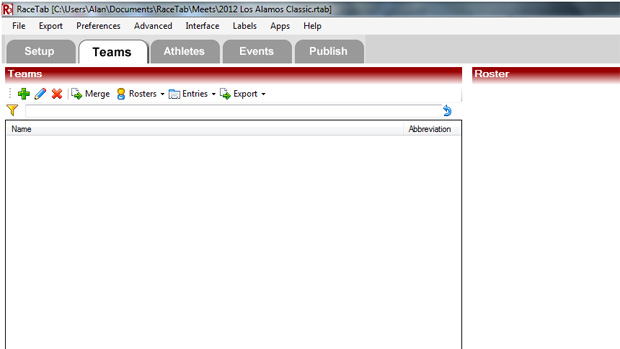
Next, with your meet open in RaceTab, go to the Teams tab.
At this tab, you will want to click on Entries/Import from Delimited File to bring your entries into the meet manager program. This will bring up the Import from Delimited File utility.
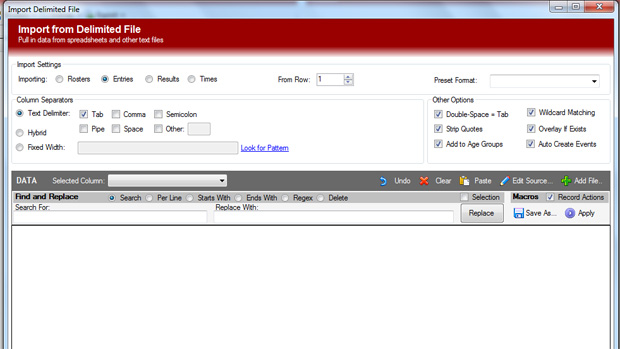
Click on the + Add File command on the right-hand portion of the utility and locate your file. Once you have selected your file, click on Open and your entry file will appear in the blank area at the bottom of the dialog. Change your text delimiter from Tab to Comma (or you can simply add Comma to your selection without removing Tab) and your entry file should neatly separate in columns as shown below:
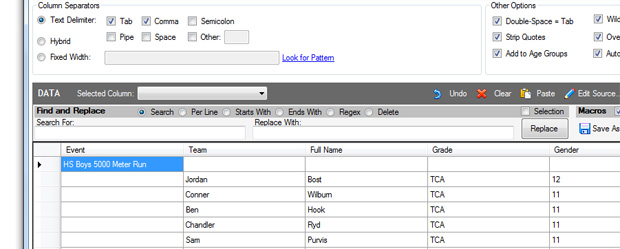
Note that the preselected column headings in RaceTab do not necessarily conform to the actual content of the columns. You will want to highlight each column of your entries file individually and click on the Selected Column dropdown to assign the correct headers to each column. Once you have done that for all columns, simply click on OK in the lower right corner of the Import from Delimited File dialog and your entries have been entered into RaceTab. That would be all of the athletes and all of the teams for your meet. If you get a late-arriving entry file, you can simply repeat this process with that file to add that team and its entries to the meet.
If you would like an Excel template for entries (this template is also ready to use for any coach to make entries into your meet), or a filled-out template of dummy entries to try on your own, simply e-mail me at the address shown in the bottom left corner of any page of this site. I would be happy to send you a copy of those files.
At the clinic, I will also show you how to set up your meet using online registration so that you can decide for yourself if you want to make that extra investment. The point here, however, is to give you a choice and let you make your own decision.